Git Basics: A Beginner-Friendly Guide

What is Git?
Git is a distributed version control system (VCS) used to track changes in source code over time. In simple words, “Git helps you save versions of your code so you can go back, compare, and collaborate safely”. Instead of manually creating folders like:
project_finalproject_final_v2project_final_final
Git handles this automatically — efficiently and reliably.
Why Git is Used
Git, Firstly is used because it solves real problems developers face daily, we know the need of a VCS, Why is it required?, But could there be other Solutions?, Are there other VCS’s? But then why Git? Why not some other VCS?
The answer lies in how Git approaches these problems. While many software can track changes, Git does it much more reliably, flexibly and smoothly. Unlike many systems that are centralised on a central server. Git is distributed, this means every developer has complete copy of the repository which makes sure that developers can develop, commit, track and inspect history locally.
Most importantly Git has become the industry standard. Platforms like GitHub, GitLab, etc. are all built around it. Hence it integrates seemlessly into modern development making everything much more smoother, easier and structured
Git Basics and Core Terminologies
Now before learning all the commands it is important that we know some basic terminologies of Git, As these terms and concepts form the foundations of how Git works and will appear many times when using/understanding it.
Repository
A repository is a directory that Git tracks. It mostly contains:
project files
A hidden
.git/folder
Once the .git/ repository is initialized, Git begins monitoring changes inside that directory [Fancy word for folder]. This can be done using the following command:
git init
Commit
A commit represents a snapshot of the project at a certain point of time. Each commit stores many metadatas, contents of the project such as:
The current state of files
A commit message describing the change
A unique hash that identifies it
Commits allow you to go through the history/versions of your code be it to add a feature, remove a bug or just look up the differences. Commits are like checkpoints in a software’s development journey.
Branch
Branches are nothing but a pointer to a sequence of commits, yes that’s it. Branches help many developers work on features independently without affecting the main code database, after the development is done the branches can be merged back. Commonly we work upon the main branch.
Head
Head is basically at which commit is Git pointing to and also commonly what was the latest commit of the currently active branch. Basically, It tells Git where you are right now.
Common Git Commands
Initialising Git
git init
This command is used to initalise an empty Git repository - basically a .git directory with subdirectories such as objects/, refs/, etc. Which are neccessary for Git to function. It basically sets up an environment for Git to work in. Which is also hidden [can be seen using ls -a] so as to keep it secure and not accidentally erase the history. Git could track files in many different ways, letterwise, linewise, blockwise? But Git gives that control to the user and thus we move to next command.
Adding Files
git add <filename>
This command is used to tell Git that start tracking a particular file, and whenever this is run Git tracks the changes in this file; be it 10 characters, 10 lines or 10 different functions and then it moves the contents of the files to the staging area.
Now even if you were dealing with some files, adding each file everytime we change something in it can be a bit tedious. Thus Git gives us another command:
git add .
This command now tells Git that track whatever is in the working directory. Which in turn saves time and makes the whole process of tracking code much smoother. But until now we have just tracked the files we have not saved any file yet, now we move on to storing the contents in the VCS.
Committing Added Files
git commit
Now that is the whole Git commit command which basically tells Git to store the content of the staging area as a repository, but in general this command is used with many options with one of the most widely used being -m. Now there are some, which are more commonly used than the others, which are listed below:-
git commit [-a] [-m <msg>] [--amend]
Let’s understand each option one by one:
[ -a ]: This option tells Git to automatically stage all modified tracked files before committing. Note: It doesn’t add new files, only those that are already tracked (Although-ais convenient, it should be used carefully).
git commit -a
[ -m <msg> ]: This option tells Git to add a message to the commit, this is one of the most widely used option with commit. It is also used to tell fellow developers that what changes happened in a particular commit.
git commit -m "Commit message"
git commit -a -m "Staging & Committing"
[ —amend ]: This allows you to modify the most recent commit. It is commonly used when you forget to add a file or you want to change the commit message.
git add <filename>
git commit --amend
git commit --amend -m "New Commit Message"
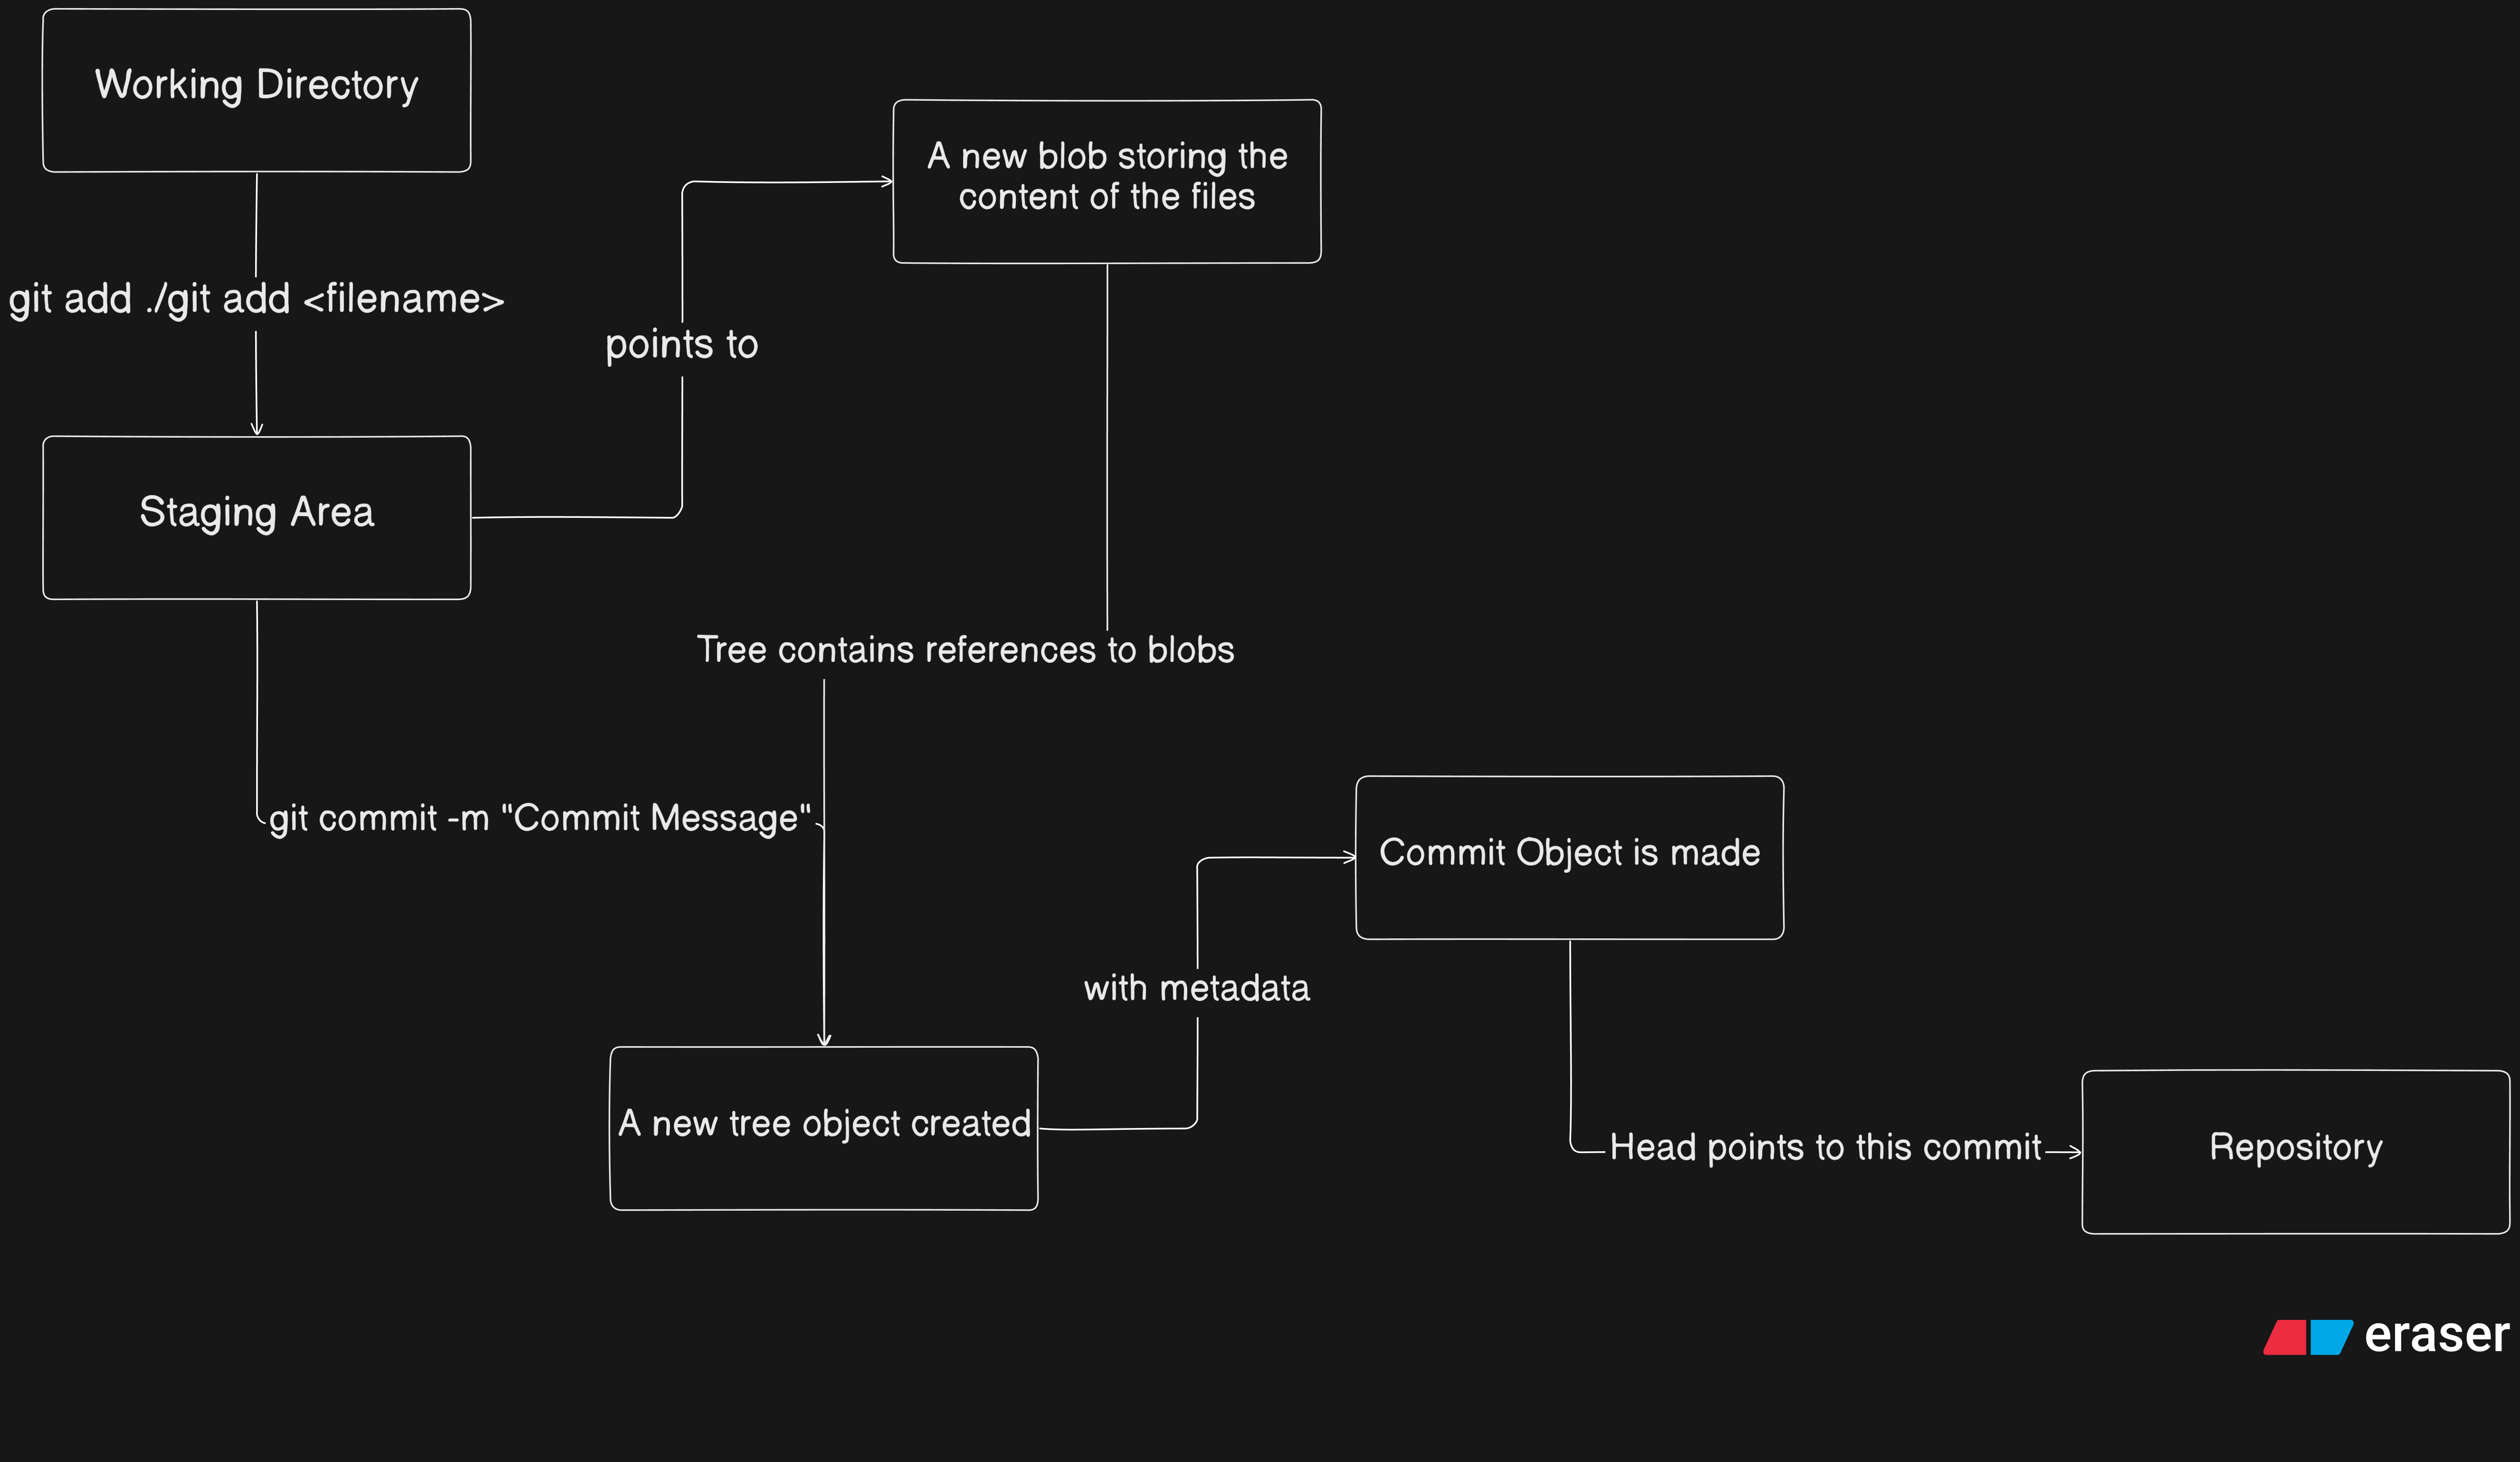
This whole process albeit complicated can be visualized as following:
We now understand some Git commands but what if we wanted to get the logs of these commits for that we move on to the next command.
Git Logs
git log
Most probably one of the simplest yet powerful commands of Git, it shows you the logs of the previous commits with details like the commit hash, author, date, commit message. It also shows at where the HEAD of the Git is pointing to. It has the following template:
commit <commit hash> [(HEAD -> <branch name>)]
Author: <Author Name> <Author Email ID>
Date:   <Date of Commit>

    <Commit Message>
There is also another flag which is very useful which is used as follows:
git log --oneline
This flag compiles all the details of commits and shows the details in the following format:
<First 7 Chars of Commit Hash> [(Head -> <branch name>)] <commit message>
Now we can use these to get the logs of the commits but what about the status of the files right this instant, for that we move on to the next command.
Git Status
git status
This command tells the current state of your repository, it tells which files are modified, which files are staged to commit, and which files are untracked. This is normally used to know what changes have occured before pushing the content to the staging area or committing the code to the repository. This similar to git log which also has an option which compresses the output, It is used as follows:
git status -s
Well now we have covered commands about how we add/commit to Git repo and how we see the status and logs of it. Sometimes we have to delete a repository as well for that we move on to the next command.
Git Reset
git reset [--soft | --hard] [-q] <commit>
As the name suggests this command resets the HEAD of Git to the previous commit to the commit hash mentioned. It has some options which we will go over now:
—soft: This tells Git to not touch the index file or the working tree, and leaves all changed files to “Changes to be committed” and shifts theHEAD.—hard: This tells Git to reset the index file and the working tree, and any changes are discarded and shifts theHEAD. This is a very powerful command and must be used carefully.-q: This is just an option which as stated in their official Documentation is to tell Git to Be Quiet and only report errors, that’s it.
Which could also be visualised as following:
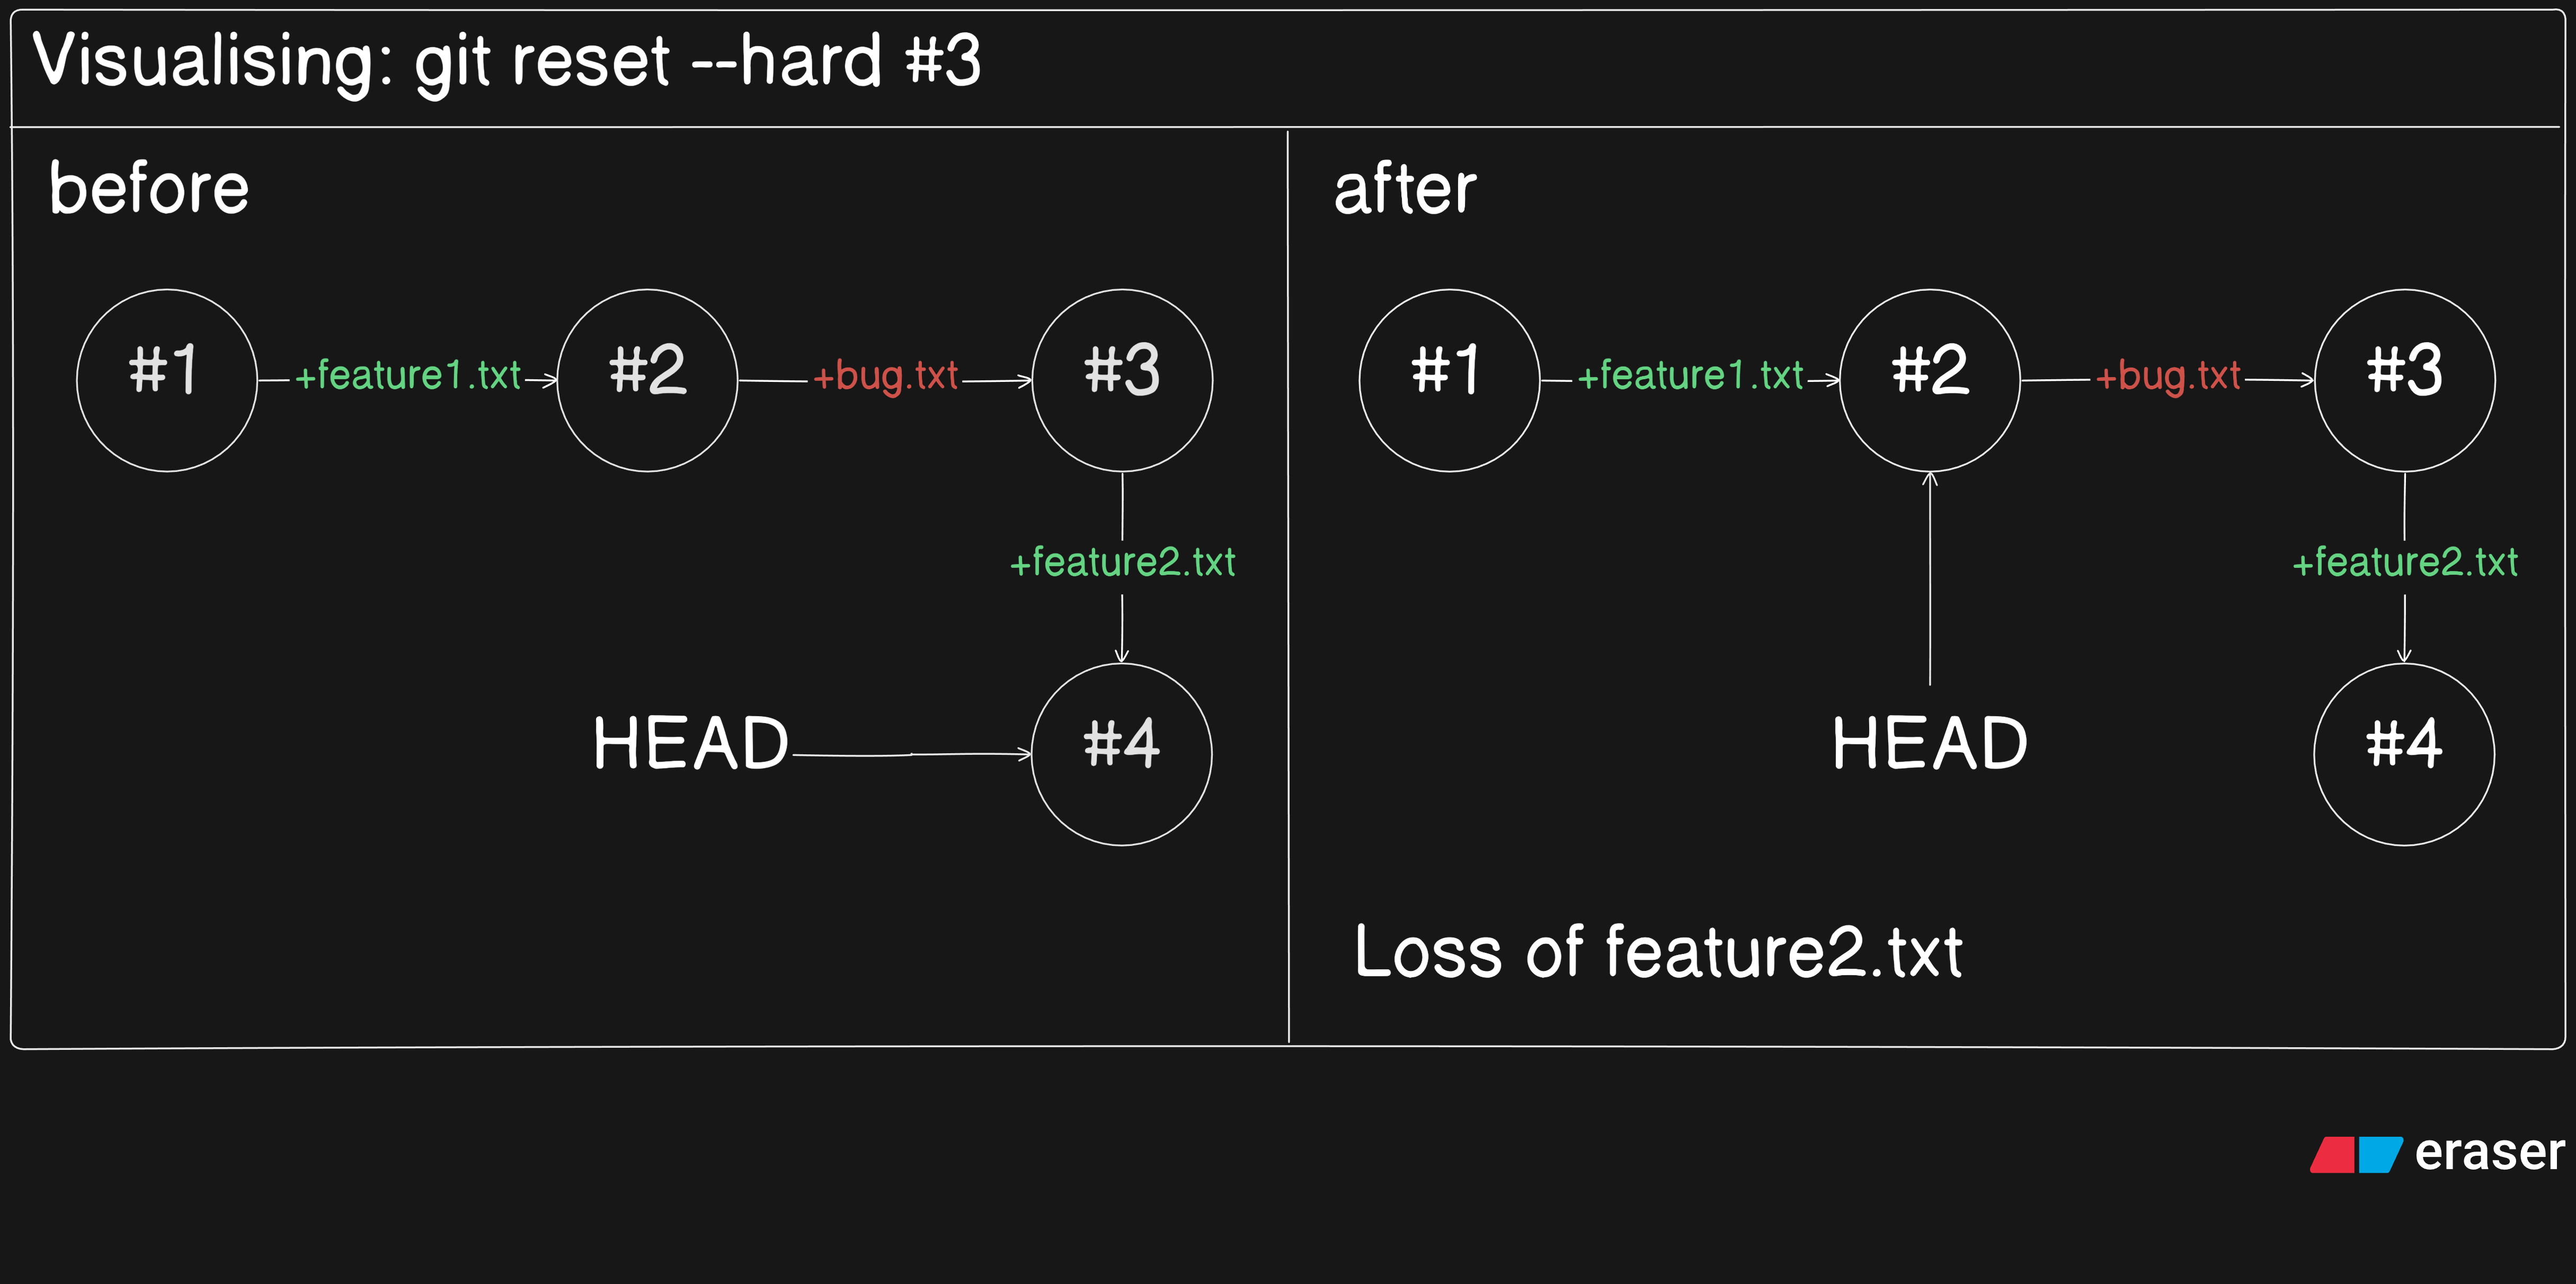
Now this command moves the HEAD of Git to the previous commit, but what if we had some perfectly working commits after a bug, maybe many we can’t afford to loose that progress. So for that we use the following command.
Git Revert
git revert <commit>
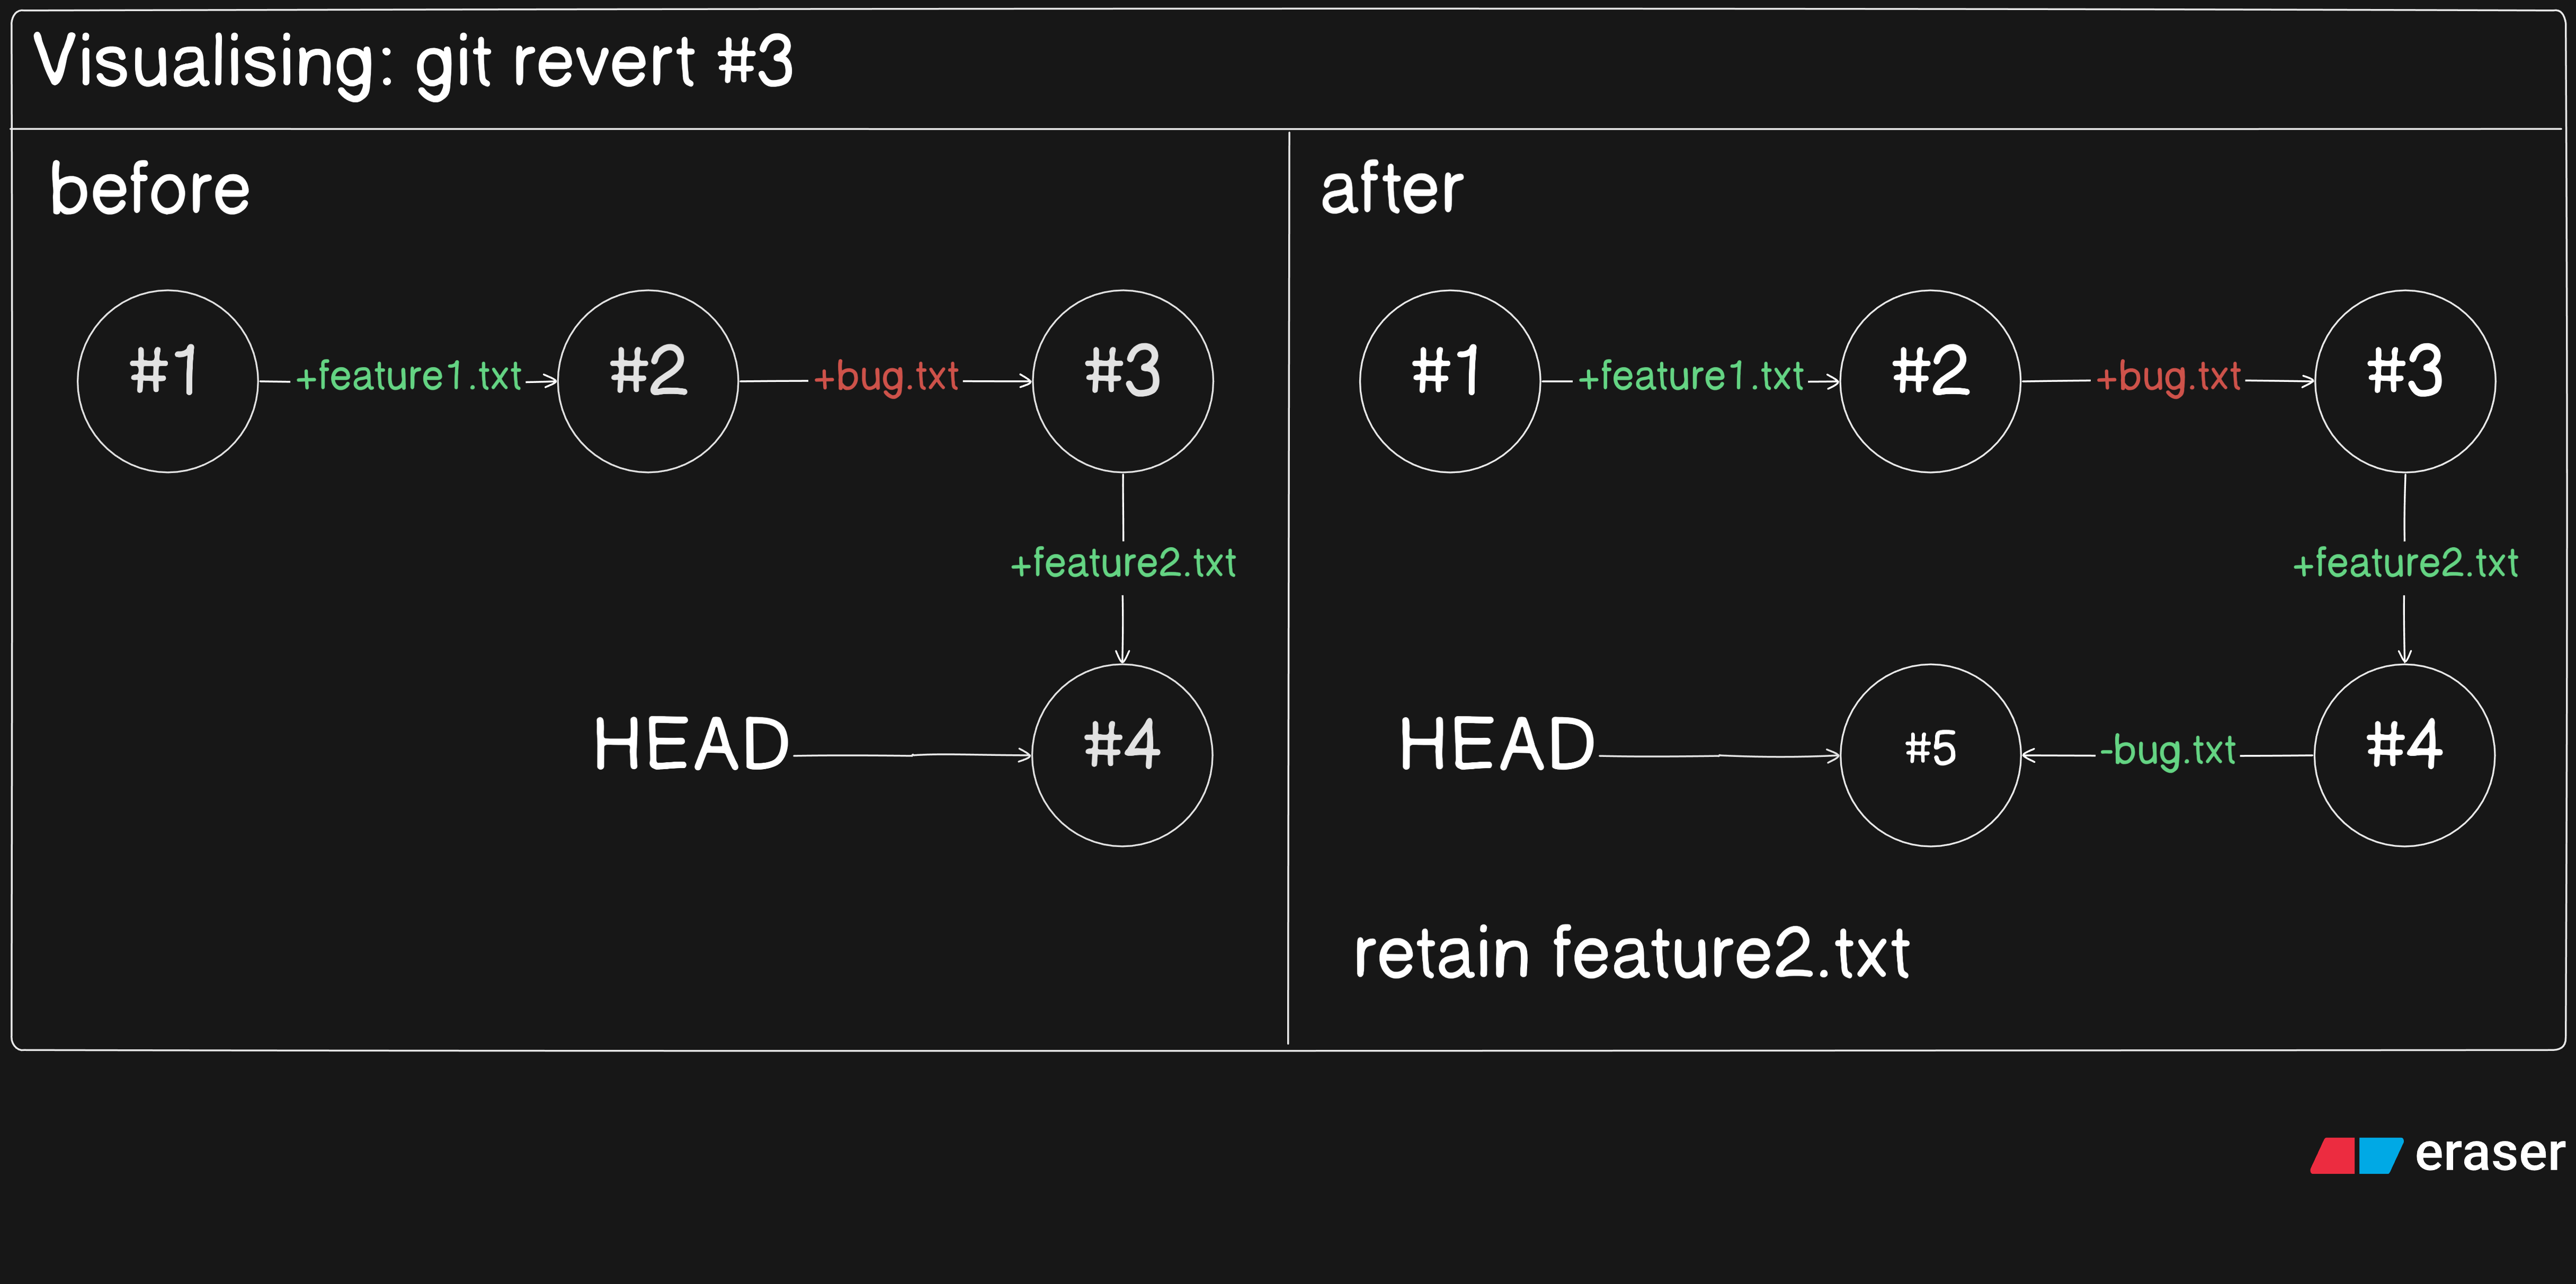
Similar to Git reset this command is used whenever you want to undo the changes of a previous command, but Git revert works differently. When we run this command it creates a new commit which only reverts the changes the related commit introduces. Thus even if there are commits after a buggy commit their changes remain untouched. It also doesn’t erase any commit as in the case of hard reset. It may be visualisied as following:
And with that we come to end of introductory Git commands as mentioned above to further study them you could refer to the official Git Docs.
Conclusion
With this we come to the end of this article, In a nutshell we started from What is Git?, Why Git? and we covered the basic terminologies and core concepts often assumed from a developer. We also covered the majority of the basic Git commands with the slight caveat for branching, which would be covered in it’s specific article so that is something to look out for. But for this we come to an end, hope you liked it and gained something from it.


